Viewing and Image Transformation Tools
The top toolbar of the VisioVIEW Viewer contains all of the tools related to viewing and image transformation. The tools are ordered in four subsections, each related to a specific functionality.
The first subsection is related to how the image is displayed (viewed) in the Viewer, while the second subsection is related to image transformations (inverted polarity, rotation, zoomed in/out). On the other hand, the third subsection is related to the measurements displayed on the image, while the fourth and last subsection is related to the Hanging Protocol settings of the Viewer.

Move Image
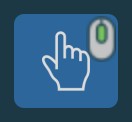
The Move Image tool is a simple tool that allows users to move or pan images that are scaled in and larger than the viewer area. The images can be moved in all four directions. This tool can be assigned to a specific mouse button.
By default, the middle scroll mouse button is assigned to this tool.
Assign a mouse button to this tool by pressing the toolbar button with the desired mouse button. Press and hold the image in the viewer area with the assigned mouse button and subsequently drag in the desired direction to pan the image.
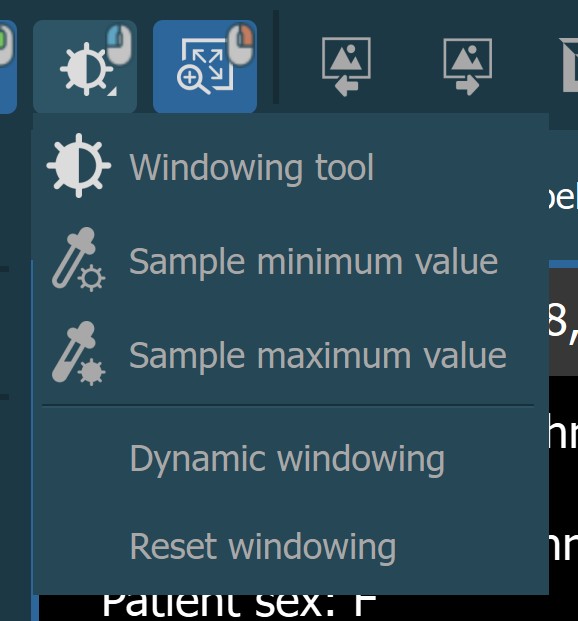
Windowing (Brightness and Contrast)

To change the window width and window center values of the DICOM image (brightness and contrast), select the Windowing tool from the viewer toolbar. Press and hold the button in the toolbar to open the complete windowing menu.
This tool can be assigned to a specific mouse button. By default, the left mouse button is assigned to this tool.
Default Windowing Tool
The default windowing tool updates the window center and window width values by dragging on the image. Assign a mouse button to this tool and press and hold the image with the assigned mouse button. Drag the mouse in one of the four directions to update the windowing of the image. To simultaneously update the brightness and contrast of the image, drag the mouse diagonally across the image.
Drag right to decrease the brightness (higher window center value)
Drag left to increase the brightness (lower window center value)
Drag up to decrease the contrast (higher window width value)
Drag down to increase the contrast (lower window width value)
Important
When the pixel values of the image are inverted, the effects of applying the windowing by dragging the mouse are inverted as well.
Sample Minimum Value
Select the Sample Minimum Value option from the windowing menu. To use the tool, assign the desired mouse button and press the image with the assigned mouse button to sample the pixel value. The window center and window width values will be
automatically calculated based on the sampled minimum value.
Sample Maximum Value
Select the Sample Maximum Value option from the windowing menu. To use the tool, assign the desired mouse button and press the image with the assigned mouse button to sample the pixel value. The window center and window width values will be
automatically calculated based on the sampled maximum value.
Dynamic Windowing
To apply the windowing of the image based on the minimum and maximum available pixel values choose the Dynamic Windowing option from the windowing menu.
Reset Windowing
Reset the applied windowing image to the default window center and window width values specified in the DICOM tags.
Windowing Sliders and Presets
When opening CT/MR modality studies in the VisioVIEW Viewer, the windowing sliders and presets are available to the users on the right side of the viewer toolbar. Modify the window center and window width of the image by dragging the appropriate slider in the desired direction, or choose one of the available windowing presets to be applied to the image. The windowing presets can be modified in this section.

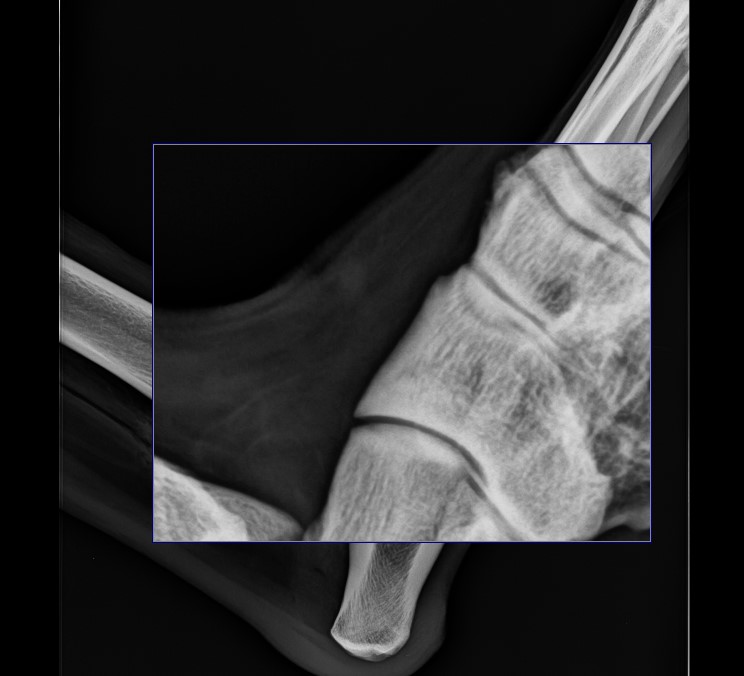
Zoom In

To quickly magnify an area of interest use the Zoom In tool from the viewer toolbar. This tool can be assigned to a specific mouse button. By default, the right mouse button is assigned to this tool.
Press and hold on the image with the assigned mouse button to activate the tool and show the zoomed in portion of the image. Move the zoomed in portion of the image by dragging the mouse the desired direction.
Previous and Next Image

When multiple images are opened in the same viewer tab, users can easily switch or toggle through the images by using the Previous Image and Next Image buttons in the viewer toolbar. The same action can be performed by using the
Left and Right arrow keys on the keyboard.
Invert Image

Users can use the Invert Image tool to invert the pixel values of the image, known in the DICOM standard as inverting the polarity of the image. This tool only has an effect on monochrome images, inverting the dark pixels into light
pixels and vice versa.
Press the Invert Image button in the viewer toolbar to invert the polarity of the image. To revert back to the original, press the button again.
Fit to Screen
Resize and scale an image to fill the entire viewer area by using the Fit to Screen button in the viewer toolbar. By default, all images in the VisioVIEW Viewer are opened to fill the entire viewer area. Modify the default setting in the
modality and manufacturer settings.
Full Zoom

Resize and scale the image to its original size regardless of the viewer area by pressing the Full Zoom button in the viewer toolbar. Set this as the default option when opening images in the modality and manufacturer settings.
Rotation and Flip

To rotate or flip (mirror) an image vertically or horizontally click the Rotate Image button in the top toolbar to open the rotation panel, where all of the actions are available.
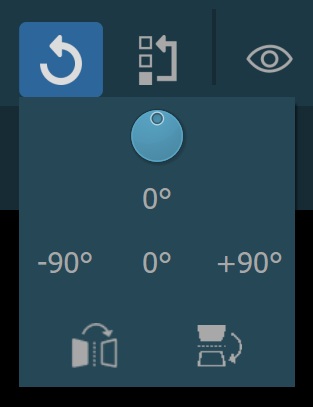

Manually change the rotation of the active image by dragging the rotation dial to the left (negative direction) or right (positive direction). The current rotation angle is displayed beneath the dial.
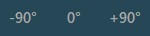
Rotate the image by +90° or -90° by pressing the corresponding buttons. Reset the rotation of the image by pressing the 0° button.

Press the Flip Horizontally button to flip or mirror the image horizontally (along the vertical axis).

Press the Flip Vertically button to flip or mirror the image vertically (along the horizontal axis).
Reset Image Transformations

Reset Image Transformations button resets the scale, position, rotation, and/or mirroring that has been applied to an image to their original default state. It does not affect any other modifications to the image.Hide/Show Measurements and Subtitles
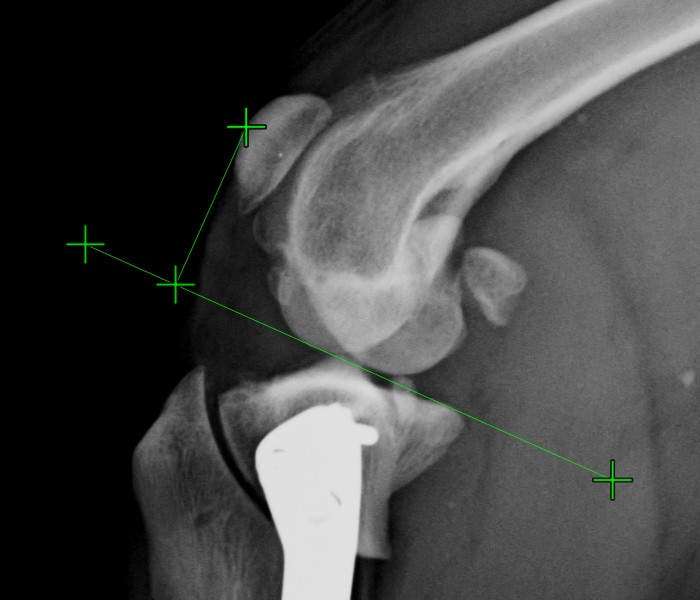
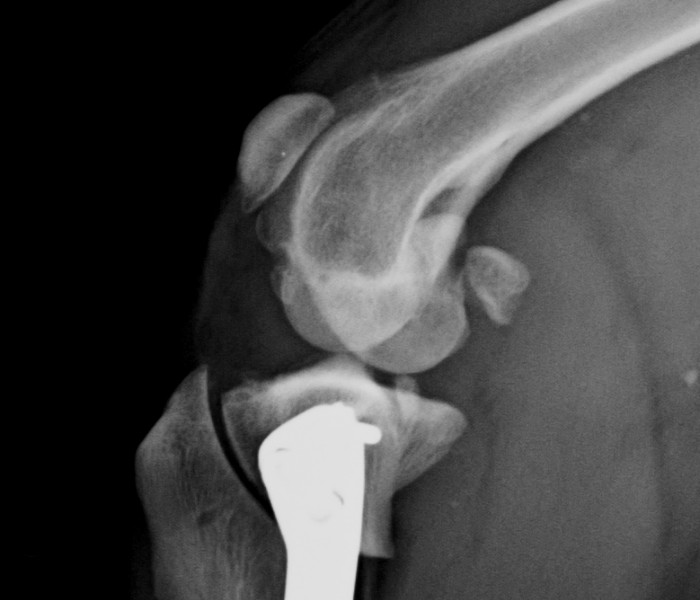
The measurements and their description and subtitles can be hidden by using the Hide/Show Measurements and Subtitles button in the viewer toolbar. Depending on the active state of the measurements, the button is accordingly updated.
The button always shows the current active state of the measurements.
Change this setting individually for each measurement by using the measurement list.

All measurements and their description and subtitles are visible in the viewer area.
All of the measurements are still visible in the viewer area, however their description and subtitles are hidden.

All measurements and their description and subtitles are hidden in the viewer area.
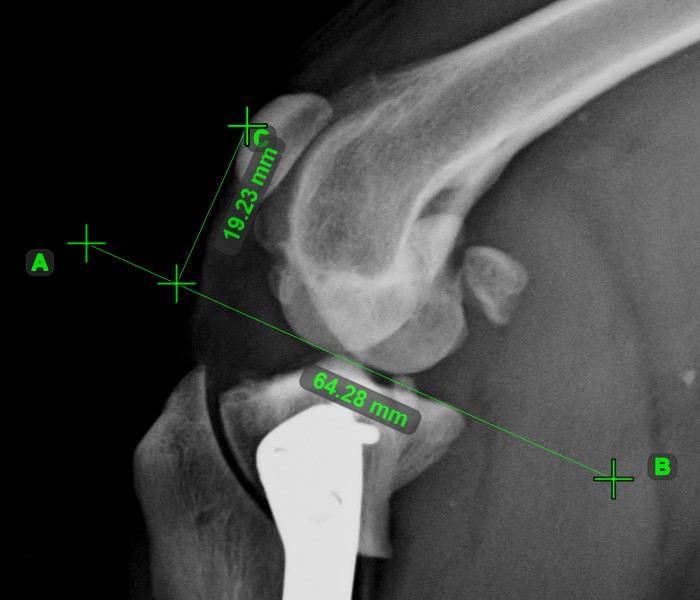
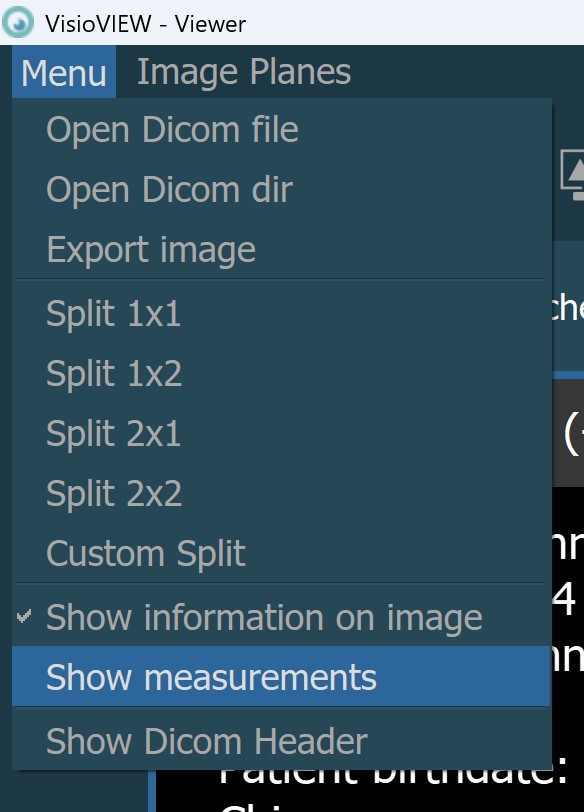
Additionally, the visibility of the measurements in the viewer area can be toggled by using the Menu -> Show measurements option from the Viewer menu.
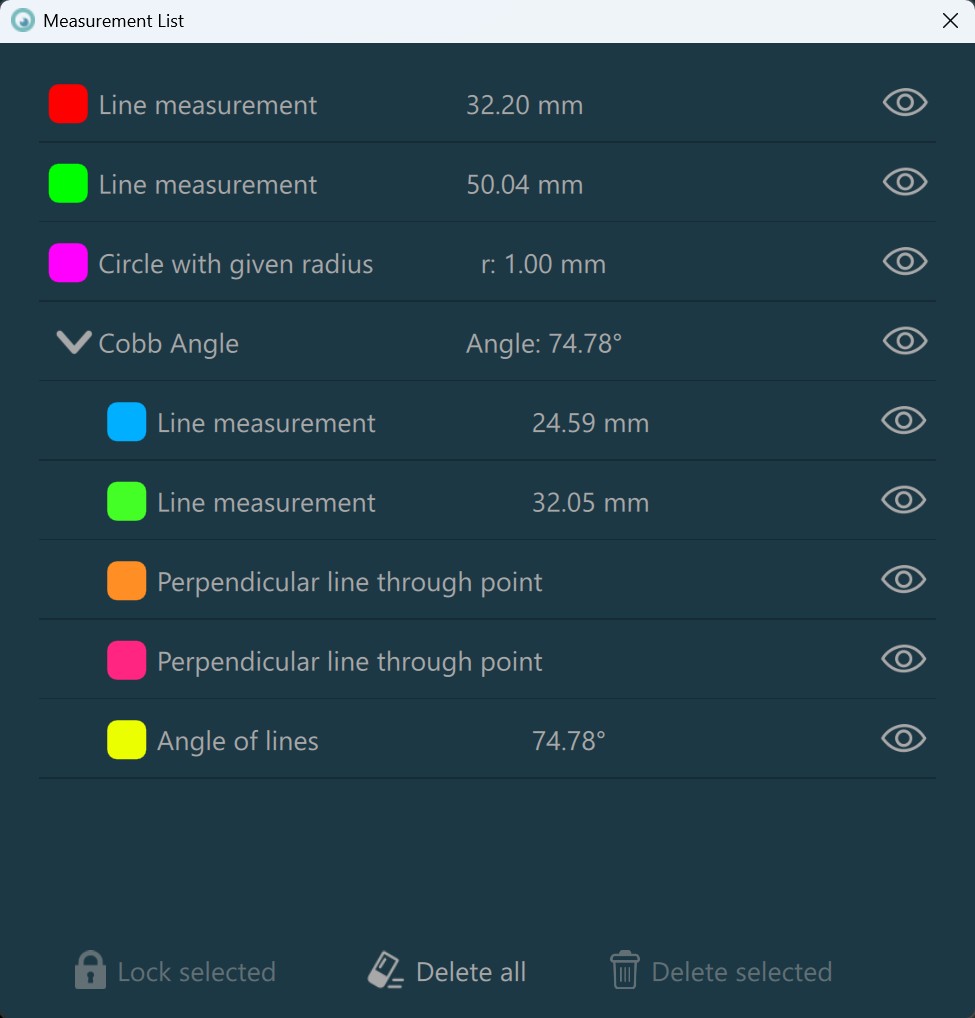
Measurement List

The measurement list is an independent window displaying all of the measurements drawn in the currently active view. Press the Measurement List button in the viewer toolbar to open the window. The window will be automatically closed
when closing the Viewer. Users can continue working in the VisioVIEW Viewer even though the list is opened in the background.
Each measurement in the list is displayed as a separate row, showing the color of the measurement, description, result and value. To individually change the visibility of measurements and their description and subtitles, press the icon on the right of each measurement entry. The button actions are the same as the global option.
Advanced measurements are constructed from the available simple measurements, thus being grouped accordingly in the measurement list. Users have the option to expand or collapse the grouped measurements that are part of each advanced measurement by pressing the arrow icon next to the advanced measurement entry. Additionally, all actions that can be performed on individual simple measurements can be performed on the entire advanced measurement group.
Select measurements from the list by pressing on the appropriate row. Toggle the measurement selection by holding down the CTRL key and pressing on the measurement entry.
Lock a measurement by selecting it from the list and pressing the
Lock selectedbutton at the bottom of the window. Locking measurements prevents them from being modified.Delete selected measurements by pressing the
Delete selectedbutton at the bottom of the window.Delete all measurements from the viewer area by pressing the
Delete allbutton at the bottom of the window.
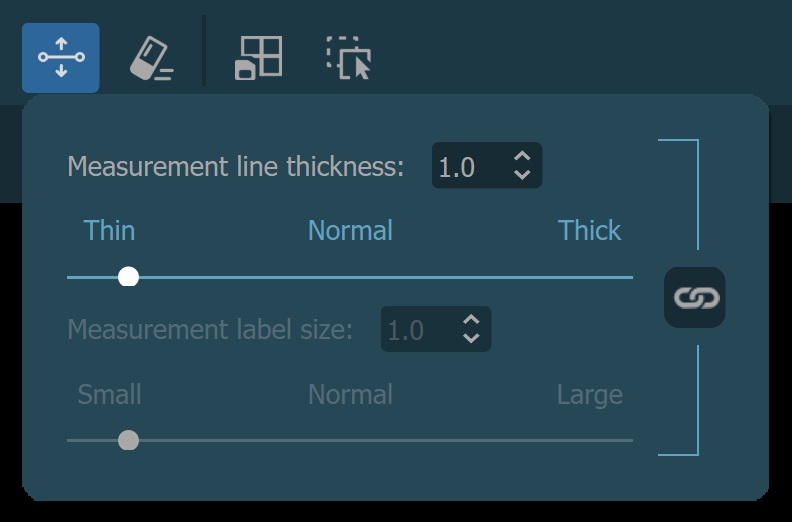
Measurement Line Thickness and Label Size

Press the Measurement Line Thickness and Label Size button in the viewer toolbar to open the corresponding panel. Updating the line thickness and label size of the measurements in the current view overrides the global settings.
To ensure better visibility and readability of the measurements in the Viewer, simply drag the corresponding slider in the preferred direction, press on one of the available preset options, or manually enter the value in the input field next to the corresponding parameter. All of the measurements in the current view are updated automatically.
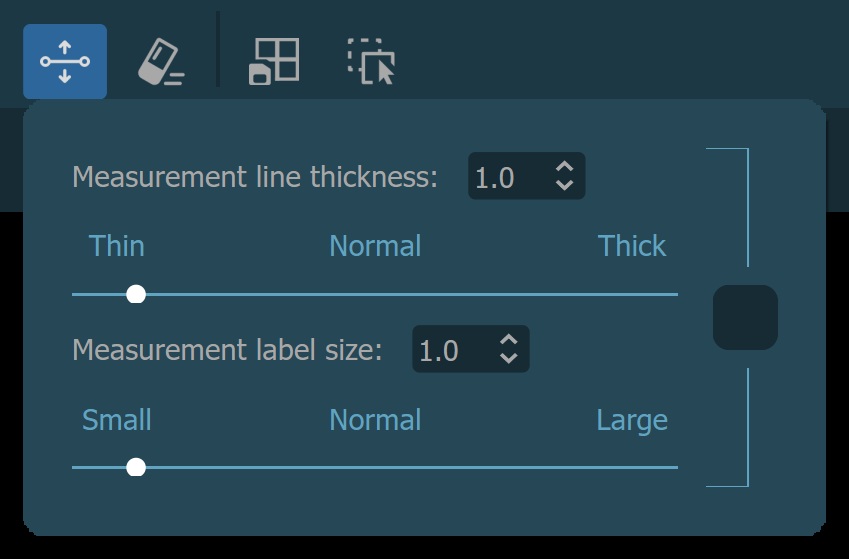
Simultaneous update to the Measurement Line Thickness and Measurement Label Size parameters is available by pressing the button connecting the two sections.
Delete All Measurements

Remove all measurements from the image in the current view by pressing the Delete All Measurements button in the viewer toolbar. Press Yes when prompted to confirm the action.
Caution
This action cannot be undone. Choose carefully when to use it, or delete only a select number of measurements by accessing the measurement list.
Toggle Hanging Protocol

Press the Toggle Hanging Protocol button to toggle the opened Hanging Protocol on/off in the VisioVIEW Viewer. The button is only available if the Viewer was initially opened with a Hanging Protocol, or if a Hanging Protocol was chosen
from the Hanging Protocol dialog.
When the Hanging Protocol is toggled off, the viewer grid is reset to a single image display. Users can create their own grid layouts, or just toggle the Hanging Protocol back on to apply their desired grid.
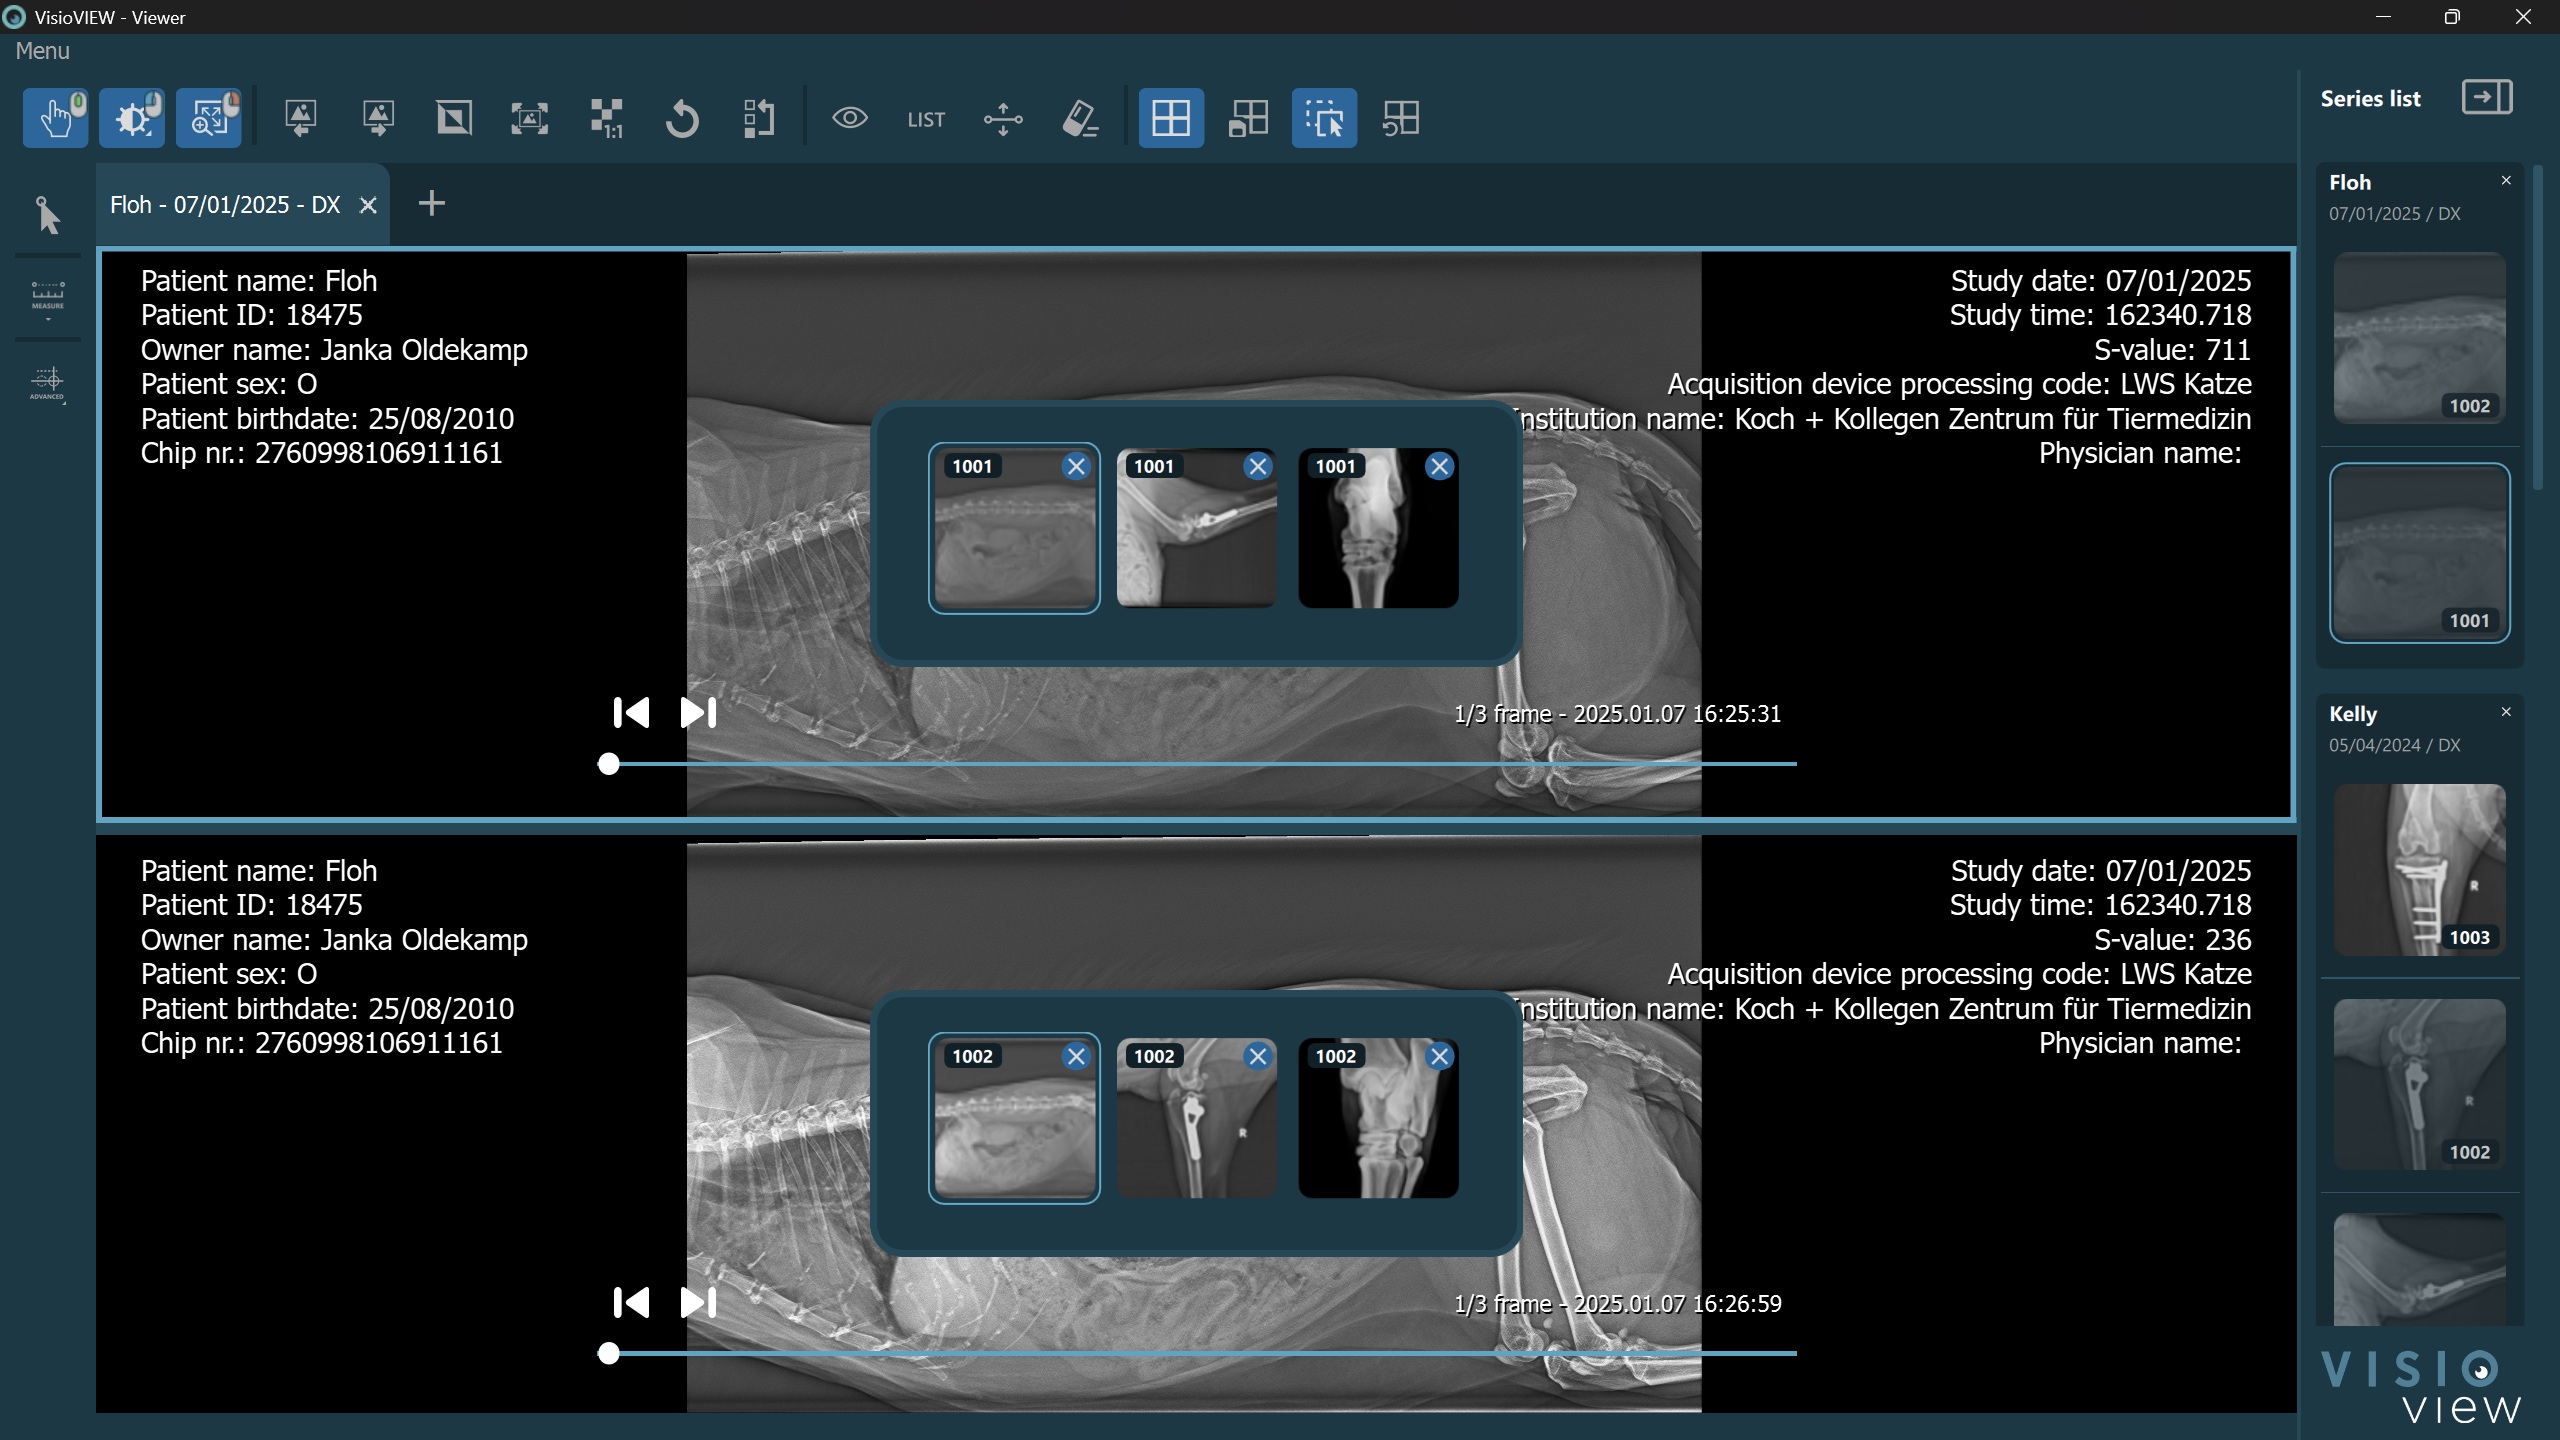
Open Viewer Image Stack

The VisioVIEW Viewer offers users the ability to stack multiple single-frame images inside one cell. This feature is also part of the Hanging Protocols, when multiple images share the same instance rules for a specific viewer cell.
To open the current image stacks of each cell, press the Open Viewer Image Stack button in the Viewer toolbar.
Users can drag and drop images from the series panel directly into an opened image stack, or drag and drop images from one stack into another. The images in the viewer stack are always ordered by the series date and time DICOM tags. The series number of each series is labeled in the top left corner of the preview representing the series.
Dropping an image directly into the cell completely discards the entire stack. Remove individual images from the stack by pressing the x button in the top right corner of each image.
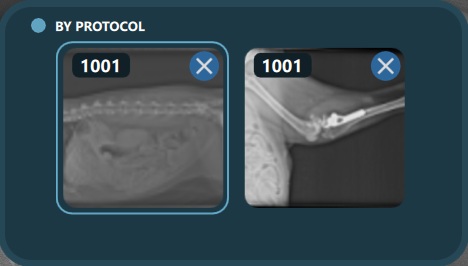
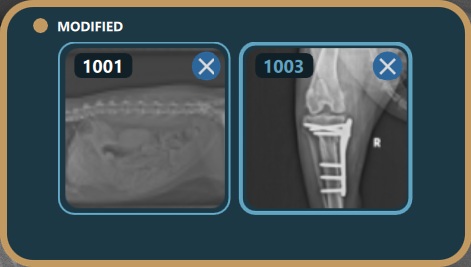
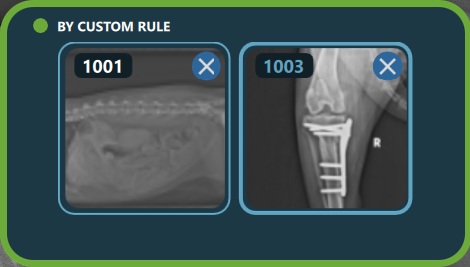
When the Viewer is opened or laid out based on a Hanging Protocol, the image stacks give additional information on the status of the images placed in that Viewer cell. The current state is also indicated with a matching color indicator on the button as well. There are three possible states that can be represented in the Viewer Image Stack:
By Protocol: All images placed inside the Viewer cells are based on the instance rules defined for each cell in the chosen Hanging Protocol’s settings.
By Custom Rule: At least one image placed inside the Viewer cell has locally assigned instance rules which overwrite its position in the Viewer based on the Hanging Protocol.
Modified: At least one image placed inside the Viewer cell modifies the layout of the Hanging Protocol, but it has yet to be assigned locally. If that change is confirmed by assigning the modified instance rules, then the state of the image stack will be changed to By Custom Rule.
More information on how the Viewer Image Stack is connected to the Viewer Series Panel is available in the following section.
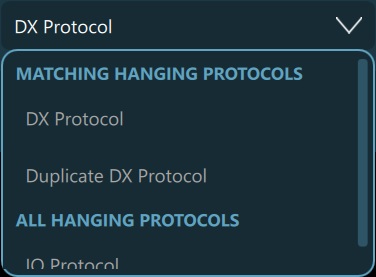
Switch active Hanging Protocol
Users can directly switch and apply any of the available Hanging Protocols directly from the dropdown menu available in the toolbar. The value inside the dropdown menu follows the state of the protocol in the Viewer (toggled ON/OFF), and the chosen protocol from the Hanging Protocol dialog. The dropdown menu is the same one from the Hanging Protocol dialog itself.
Open Hanging Protocol Dialog

Settings icon next to the dropdown. Press Ok to close the dialog.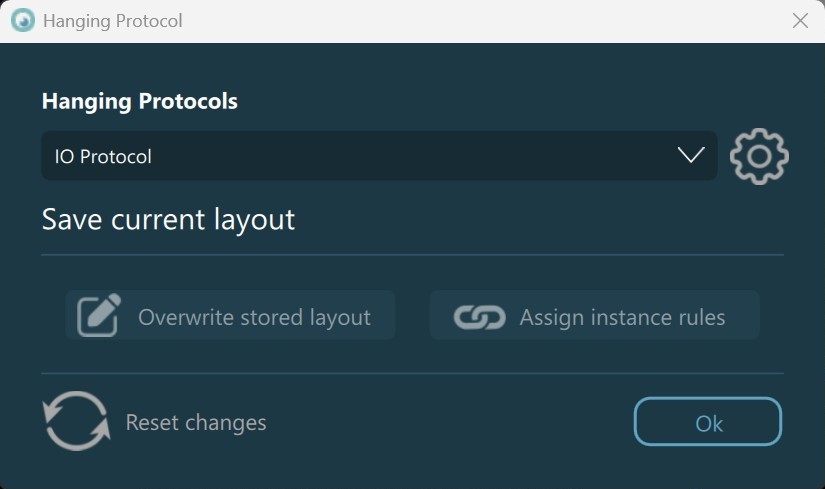
Overwrite Stored Layout: Overwrite the layout and grid rules for the selected Hanging Protocol. The button becomes enabled when users manually modify the size of the cells in the viewer grid, or when changing the number of rows or columns in the viewer grid from the viewer menu.
Assign Instance Rules: DICOM images can be placed in any cell of the viewer grid once the VisioVIEW Viewer is opened by using the viewer image stack, or by opening them from the series panel. When a Hanging Protocol is active in the Viewer, images that are placed in the grid without meeting the criteria for the Hanging Protocol instance rules can be assigned to the instance rules related to the specific cell based on the selected Hanging Protocol. Once assigned, these instance rules override the specific DICOM tag values in the DICOM file itself.
Reset Changes: Reset any unsaved changes to the layout and grid rules of the selected Hanging Protocol (updated viewer grid, updated cell sizes, and/or reordered or modified images).
Reset Rules

Reset any unsaved changes to the layout and grid rules of the selected Hanging Protocol (updated viewer grid, updated cell sizes, and/or reordered or modified images). Additionally, using this tool resets all locally assigned instance rules to any opened DICOM images in the Viewer.
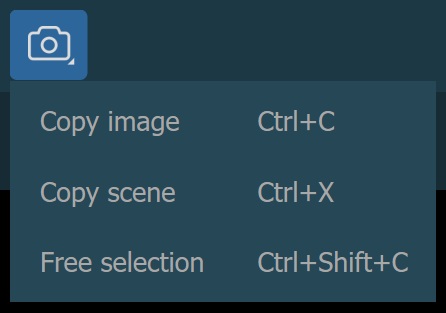
Screen Capture

The VisioVIEW Viewer offers users the ability to capture screenshots of the opened images by using the Screen Capture tool from the viewer toolbar. Press and hold the button in the toolbar to open the complete screen capture menu.
There are three available options to capture screenshots from the Viewer. Copy Image will copy the image in the active viewport in the Viewer, Copy Scene will take a screenshot of the entire scene in the Viewer,
while the Free Selection option allows users to select an area which needs to be captured.
All options can also be activated by following the specified keyboard shortcuts in the menu. The screenshots are automatically saved in the clipboard.