Measurement Tools
Access the available measurement tools in the CT Viewer by toggling the Measurements dropdown in the left toolbar. Each measurement can be assigned to one of the available mouse buttons.
When a measurement is drawn on the scene, it is directly applied to the specific image slice currently being viewed. If the slice is no longer visible, the measurement is also hidden until the slice is active again in the viewport.
To easily locate measurements on different image slices, use the available options in the Measurement List window.
Measurement Values
Some of the CT Viewer measurement tools are used to mark an area on the active image slice. There are four values which are automatically calculated and displayed alongside these measurements.
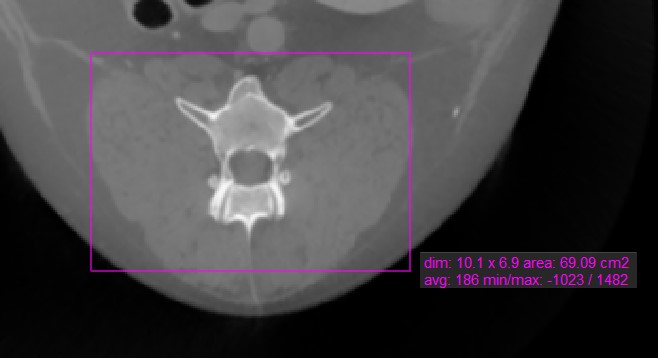
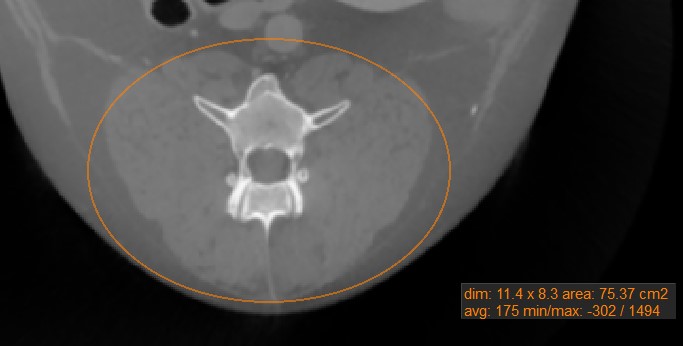
Dim: Dimensions of the measurement (width, height, distance)
Area: The area inscribed with the measurement, calculated in square centimeters
Average: The average tissue density value (HU) inscribed by the measurement. Higher HU values indicate denser tissue, such as bones.
Minimum/Maximum: The minimum and maximum value indicate the minimum and maximum tissue density value inscribed by the measurement.
Distance

Use the Distance measurement tool to precisely measure the distance between two points with precision.
Select the Distance tool and assign it to one of the available mouse buttons. To calculate the distance, place two points on the active image slice by pressing on the appropriate position with the mouse. The distance
between the two points will be automatically calculated. This tool is assigned to the middle mouse scroll button by default.
Modify the start and end point by using the Default tool from the left toolbar. The distance between the points will be automatically recalculated.

Angle

The Angle tool is a simple and effective way to calculate an angle by placing three points.
Select the Angle tool and assign it to one of the available mouse buttons. The measurement is constructed by placing three points (the start point of the initial side, the vertex, and the end point of the terminal side)
on the active image slice. Both inner and outer angles between the lines are automatically calculated.
Modify the three points to automatically recalculate the angles by using the Default tool from the left toolbar.

Rectangle

The Rectangle tool offers users the ability to mark a rectangular area on the active image slice.
Select the Rectangle tool and assign it to one of the available mouse buttons. Start the measurement by pressing on the active image slice and drag the mouse to obtain a rectangular shape. Release the mouse
when satisfied with the size of the marked area.
All available measurement values are displayed alongside the measurement.
Modify the marked area by moving one of the four points of the rectangular shape using the Default tool.
Oval

Mark oval areas of the active image slice by using the Oval measurement tool.
Select the Oval tool and assign it to one of the available mouse buttons. Start the measurement by pressing on the active image slice and drag the mouse to obtain an oval shape. Release the mouse when satisfied
with the size of the marked area.
All available measurement values are displayed alongside the measurement.
Modify the marked area by moving one of the four points describing the rectangle around the oval shape using the Default tool.
Polygon

Users can create, measure and mark custom rounded areas on the active image slice by using the Polygon tool.
Select the Polygon tool and assign it to one of the available mouse buttons. Start the measurement by placing points on the active image slice. As the user places the points, the software automatically connects them
and creates the rounded shape.
Complete the measurement by manually closing the path, or double-click when placing the last point to automatically close it. All available measurement values are displayed alongside the measurement.
Modify the marked area by moving one of the points describing the shape using the Default tool.

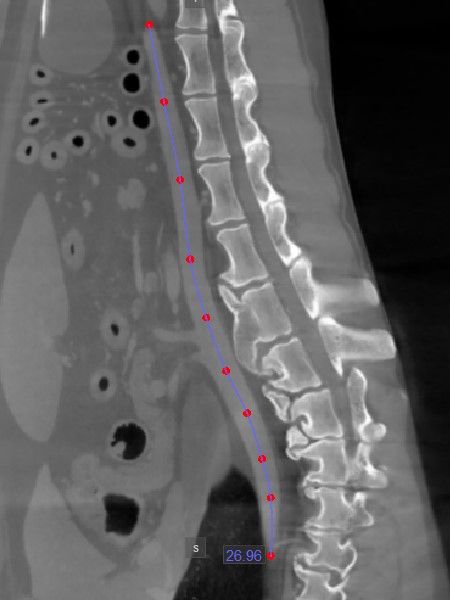
Path Length

The Path Length tool offers users the ability to measure the length of irregular lines or the outline of intricate shapes along a non-linear path.
Select the Path Length and assign it to one of the available mouse buttons. Start the measurement by placing points along a non-linear path on the active image slice. As the user places the points, the software
automatically connects and creates the path.
Complete the measurement by double-clicking when placing the last point of the path, or use the right mouse button to immediately calculate the path. The length of the path is displayed alongside the measurement.
Modify the path by moving one of the points describing it using the Default tool.
Brush Tool

The Brush tool allows users to create freehand shapes and drawings on the image.
Toggle the Brush measurement tool by pressing on the icon in the left toolbar.
Set the size of the brush by using the input field in the popup.
Select the
+option for drawing, or the-option for erasing.Press on the image to initiate the drawing, and continue by moving the cursor to draw the shape.
Complete the measurement by pressing the right mouse button on the image.
All available measurement values are displayed alongside the measurement.
