Hanging Protocols
The Hanging Protocols section enables users to create, configure, delete, reorder, and apply standardized viewing layouts for DICOM images across multiple imaging modalities. These protocols determine how image series are displayed on one or more screens
based on specific criteria defined by the users. By specifying precise and consistent layout and instance rules, the Hanging Protocols ensure an efficient and adaptive configuration tailored to each clinician’s preferences. Mark protocols as selected
by pressing on the desired entry or deselect a protocol by holding the CTRL key and pressing on the selected entry.
Protected Hanging Protocols are predefined system protocols that cannot be modified or deleted. They are marked with the label Protected and ensure consistency and compatibility between versions of the software.
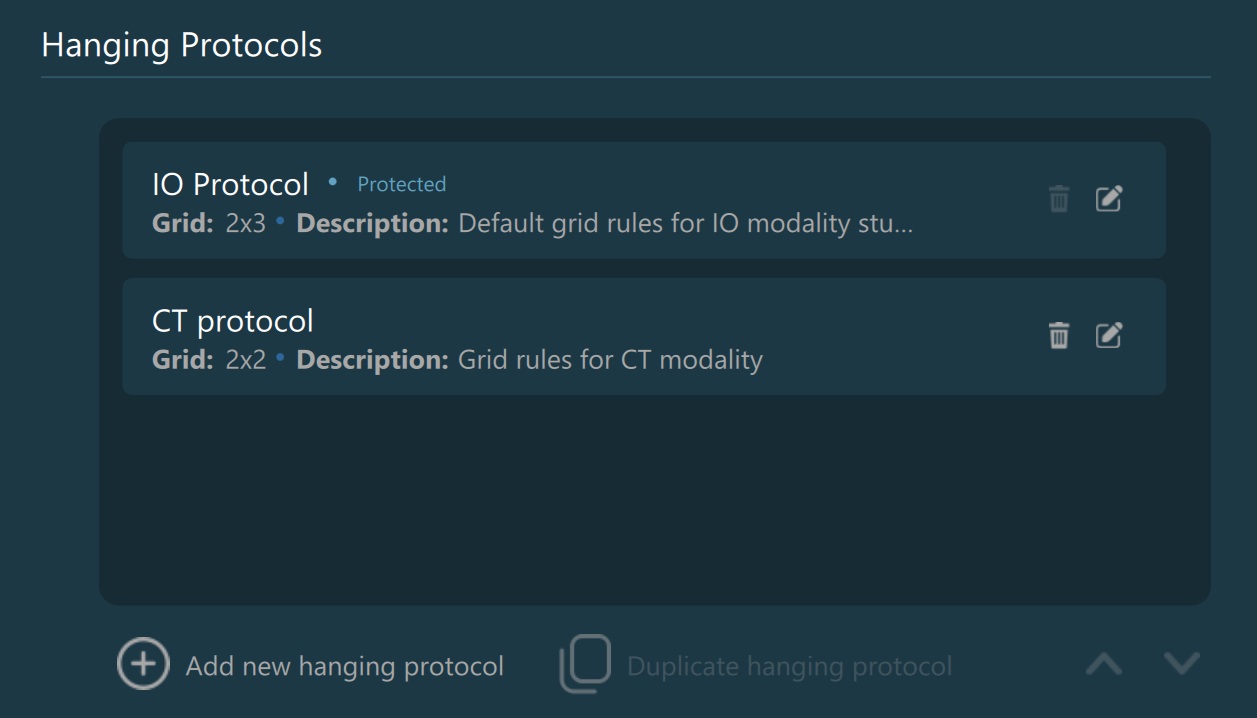
Hanging Protocol Actions

Add new Hanging Protocol: Allows the user to create a new custom Hanging Protocol. The user can specify the protocol name, description and grid configuration.
Duplicate Hanging Protocol: Creates an exact copy of the selected protocol. The duplicated protocol will automatically have an appended numerical suffix to its name to distinguish it from the original.


Add/Edit Hanging Protocols
Configure the parameters that define a DICOM Hanging Protocol. To close the dialog and confirm the changes, press OK. Press Discard to cancel any of the modifications and close the dialog.


Basic Settings
Name: The name of the Hanging Protocol, appearing throughout the Hanging Protocol sections of the application.
Description: Brief information describing the intended use or purpose of the protocol.
Study Rules
Specify and define the rules used to associate studies with the chosen Hanging Protocol. Mark the specific study rule as selected by pressing on the row, or deselect it by holding the CTRL key and pressing on the selected row.

Add new: Adds a new entry into the study rules list for the chosen Hanging Protocol.
Add Dicom Tag…: Double-click on the corresponding field to mark it as editable. Begin by typing a DICOM tag value/name, and a filtered list of values are displayed to autocomplete the entry.
- Condition: Choose an option from the dropdown for how the value of the selected DICOM tag should be evaluated.
Match: The DICOM tag’s value must exactly match the specified value.
Exclude: The DICOM tag’s value must not exactly match the specified value.
Begin With: The DICOM tag’s value must start with the specified value.
End With: The DICOM tag’s value must end with the specified value.
Contain: The DICOM tag’s value must contain the specified value anywhere within it.
Value: Double-click on the corresponding field to mark it as editable. Specify the text or numerical value that the selected DICOM tag will be compared against, based on the chosen condition.
Delete selected: Removes the currently selected study rule from the list.

Layout and Instance Rules
Define and modify the grid layout for the chosen Hanging Protocol. Add/modify the instance rules related to each cell in the grid, and freely resize each cell to fit the specific needs and layout.

Rows: Use the increment/decrement arrows or type directly into the field to set the number of rows in the grid. The maximum number of rows allowed is 10.
Columns: Use the increment/decrement arrows or type directly into the field to set the number of columns in the grid. The maximum number of columns allowed is 10.
Add rule: Attach a new layout rule to the specific cell in the grid.
Edit cell rule: Press the edit icon in the bottom right corner or double-click anywhere in the cell to modify the existing layout rule.
Resize cells: Manually adjust the cell sizes by dragging the borders of the defined grid into the preferred direction. Alternatively, cell dimensions can be precisely set by specifying exact values when editing the layout rules.
Add/Edit Instance Rules

Add new: Adds a new entry into the instance rules list for the chosen cell in the grid.
Add Dicom Tag…: Double-click on the corresponding field to mark it as editable. Begin by typing a DICOM tag value/name, and a filtered list of values are displayed to autocomplete the entry.
- Condition: Choose an option from the dropdown for how the value of the selected DICOM tag should be evaluated.
Match: The DICOM tag’s value must exactly match the specified value.
Exclude: The DICOM tag’s value must not exactly match the specified value.
Begin With: The DICOM tag’s value must start with the specified value.
End With: The DICOM tag’s value must end with the specified value.
Contain: The DICOM tag’s value must contain the specified value anywhere within it.
Value: Double-click on the corresponding field to mark it as editable. Specify the text or numerical value that the selected DICOM tag will be compared against, based on the chosen condition.
Delete selected: Removes the currently selected instance rule from the list.
Cell size: Adjust the column width or row height of the chosen cell in the grid. The values are calculated as percentages of the full grid dimensions. The minimum allowed percentage value for both width and height is 5%. The maximum allowed percentage value is calculated as the difference between the full grid dimension (100%) and the product of the remaining columns or rows multiplied by the minimum percentage value (5%).