Export Files

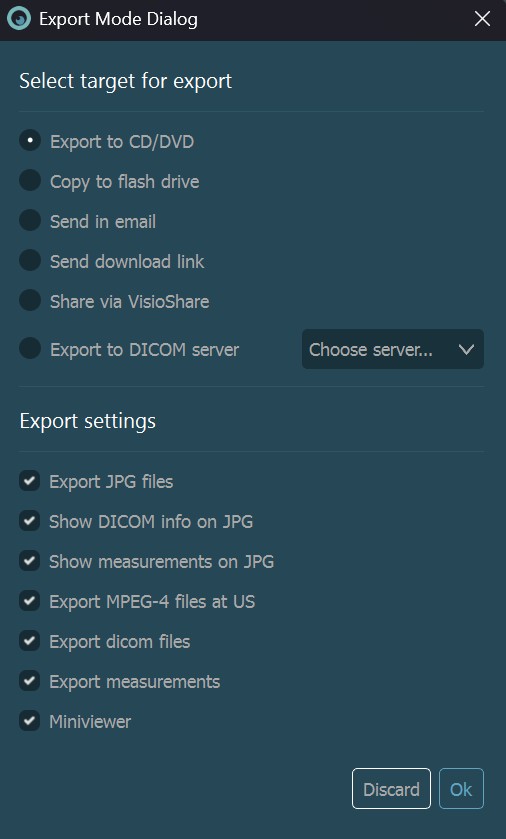
To export selected patient, studies, and/or series, press the Export icon in the Study Browser toolbar or select the Export selected images.. option from the context menu.

Ok to initiate the process. VisioVIEW will start preparing the files for export and users can easily monitor the progress and status of the process. To discard the process, press Discard.Export Targets
VisioVIEW offers several options for exporting the prepared files.
Export to CD/DVD
Wait for VisioVIEW to prepare the files for export. Once the data preparation has been completed successfully, select the target device at the bottom of the export dialog.
Ensure that an empty, writable CD/DVD has been inserted into the target device. Press
Refresh Mediaif the device wasn’t recongnized.Press
Burnto begin the burning process on the selected target device. To discard the ongoing process, pressDiscard.
Copy to Flash/Local Drive
Wait for VisioVIEW to prepare the files for export. Once the data preparation has been completed successfully, select the export destination at the bottom of the export dialog. Choose the desired location by browsing the system’s File Browser.
Ensure that there is enough free space on the chosen destination. The size of the prepared export is shown in the dialog.
Press
Export filesto copy the prepared files to the selected location. To discard the ongoing process, pressDiscard.
Send in Email
To use this option, ensure that the email settings are configured correctly. Due to attachment size limitations when sending emails, DICOM and MPEG-4 video files are prohibited during the export process, as well as the separate DICOM Start software.
Wait for VisioVIEW to prepare the files for export. Once the data preparation has been completed successfully, enter the required information in the input fields. Set up email templates to make the work easier and faster.
Email Address: The email address of the user to which the email should be sent.
Subject: The subject of the email.
Message: Additional message to be sent alongside the attached files.
Press
Send mailto send the email once all required information has been entered. To discard the ongoing process, pressDiscard.To continue working uninterrupted while the VisioVIEW software prepares the files for export, press the
Export in backgroundbutton.
Send Download Link
Enable the AWS services to have this option available during export. Ensure that the email settings are configured correctly before proceeding.
Wait for VisioVIEW to prepare the files for export. Once the data preparation has been completed successfully, enter the required information in the input fields. Set up email templates to make the work easier and faster.
Email Address: The email address of the user to which the email should be sent.
Subject: The subject of the email.
Message: Additional message to be sent alongside the download link. Make sure that the download link is unchanged before the email is sent.
Press
Send mailto send the email once all required information has been entered. To discard the ongoing process, pressDiscard.To continue working uninterrupted while the VisioVIEW software prepares the files for export, press the
Export in backgroundbutton.
Export to DICOM Server
Users have the ability to transfer files from one PACS server to another. This feature is only limited to DICOM files.
Select the target PACS server from the
Export to DICOM Serverdropdown.When the export process is started, the VisioVIEW opens the upload status window, where users can track the progress of each DICOM file being uploaded to the target server. To discard the process, press the
Discardbutton. To close the window once the process is complete, pressOK.Exporting large amount of files can take several minutes. Press
Upload in backgroundto continue using the VisioVIEW software uninterrupted while the files are being exported in the background.
Information
Regardless of the chosen export target and mode, users can customize the exported file names by specifying the desired template.
Export Settings
VisioVIEW offers a variety of options available for all export targets. Some limitations to these settings may apply based on the chosen mode.
Export JPG Files: Export DICOM files as JPG images. Specify the quality of the exported images in the Export Settings.
Show DICOM Information on JPG Files: Toggle whether the annotations will be rendered on the exported JPG images. This option is enabled only if the files are selected to be exported as JPG images.
Show Measurements on JPG Files: Toggle whether the saved measurements for the prepared DICOM files will be rendered on the exported JPG images. This option is enabled only if the files are selected to be exported as JPG images.
Export MPEG-4 Files at US: Export DICOM multi-frame US (ultrasound) modality files as MPEG-4 video files. Specify the quality of the exported videos in the Export Settings.
Export DICOM Files: Export the selected DICOM files.
Export Measurements: Export the saved measurement files alongside the corresponding DICOM files. This option is enabled only if the DICOM files are selected for export.
MiniViewer: Include the separate
DICOM Startsoftware alongside the exported files. Choose to view the exported DICOM files in theVisioVIEW MiniViewer, or open theVisioVIEW Gallerywith the exported JPG images in the browser. This option is enabled only if the DICOM files are selected for export.


