Mérőeszközök

A CT-megjelenítő elérhető mérőeszközeihez a bal oldali eszköztárban található Mérések váltása legördülő menü megnyitásával férhet hozzá. Minden mérést hozzárendelhet az elérhető egérgombok egyikéhez.
Amikor egy mérés a jeleneten kerül felvitelre, az közvetlenül a jelenleg megtekintett kép szeletre kerül felvitelre. Ha a szelet már nem látható, a mérés is el van rejtve, amíg a szelet újra aktív nem lesz a nézetablakban.
A mérések könnyű megtalálásához a különböző kép szeleteken használja a Mérések listája ablakban elérhető lehetőségeket.
Mérési értékek
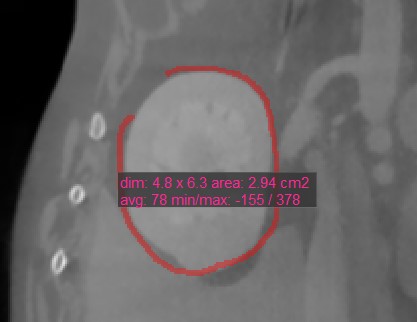
A CT-megjelenítő egyes mérőeszközei a aktív kép szeletén egy terület kijelölésére szolgálnak. Négy érték van, amely automatikusan kiszámításra kerül és megjelenik ezekkel a mérésekkel együtt.
Méret: A mérés méretei (szélesség, magasság, távolság)
Terület: A méréssel jelölt terület, négyzetcentiméterben számítva
Átlag: A mérés által jelölt szöveti sűrűség átlagértéke (HU). A magasabb HU-értékek sűrűbb szövetet jelentenek, például csontot.
Minimum/Maximum: A minimum és maximum érték a mérés által jelölt szöveti sűrűség minimum és maximum értékét jelzi.
Távolságmérés
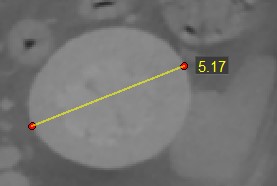
A két pont közötti távolság pontos méréséhez használja a Távolságmérés eszközt.
Válassza ki a Távolságmérés eszközt, és rendelje hozzá az elérhető egérgombok egyikéhez. A távolság kiszámításához helyezzen el két pontot az aktív kép szeletén az egér megfelelő gombjának megnyomásával. A két pont közötti távolság automatikusan kiszámításra kerül. Ez az eszköz alapértelmezés szerint a középső egérgörgő gombhoz van rendelve.
A kezdő- és végpont módosításához használja a bal oldali eszköztár Alapértelmezett eszközét. A pontok közötti távolság automatikusan újraszámításra kerül.
Szögmérés

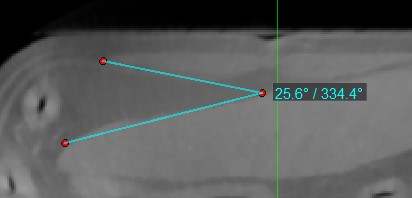
A Szögmérés eszköz egyszerű és hatékony módja egy szög kiszámításának három pont elhelyezésével.
Válassza ki a Szögmérés eszközt, és rendelje hozzá az elérhető egérgombok egyikéhez. A mérés három pont elhelyezésével történik az aktív kép szeletén (a kezdeti oldal kezdőpontja, a csúcs és a végső oldal végpontja). A vonalak közötti belső és külső szögek automatikusan kiszámításra kerülnek.
A három pont módosításához használja a bal oldali eszköztár Alapértelmezett eszközét, a szögek automatikus újraszámításához.
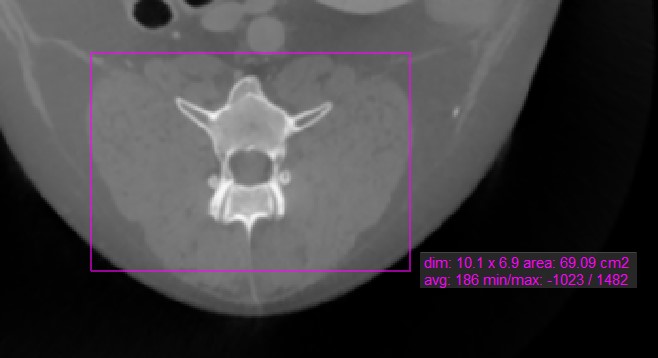
Téglalap mérés

A Téglalap mérés eszköz lehetővé teszi a felhasználók számára, hogy téglalap alakú területet jelöljenek az aktív kép egy szeletén.
Válassza ki a Téglalap mérés eszközt, és rendelje hozzá az elérhető egérgombok egyikéhez. Indítsa el a mérést az aktív kép szeletén való kattintással, majd húzza az egeret a téglalap alak eléréséhez. Engedje el az egeret, ha elégedett a kijelölt terület méretével.
Az összes elérhető mérési érték megjelenik a mérés mellett.
A kijelölt terület módosításához mozgassa a téglalap alak négy pontjának egyikét a Alapértelmezett eszközzel.
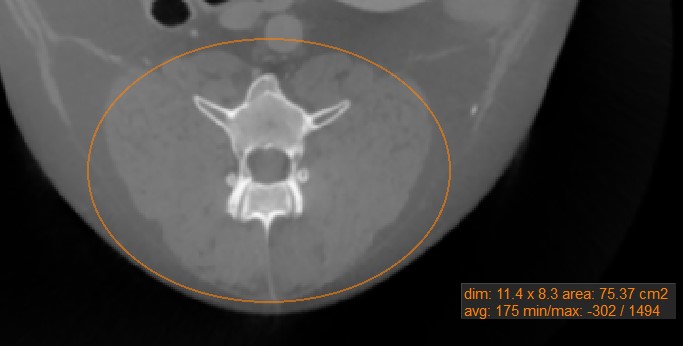
Ovalis mérés

Az aktív kép szeletén ovális területeket jelölhet a Ovalis mérés eszközzel.
Válassza ki a Ovalis mérés eszközt, és rendelje hozzá az elérhető egérgombok egyikéhez. Indítsa el a mérést az aktív kép szeletén való kattintással, majd húzza az egeret az ovális alak eléréséhez. Engedje el az egeret, ha elégedett a kijelölt terület méretével.
Az összes elérhető mérési érték megjelenik a mérés mellett.
A kijelölt terület módosításához mozgassa a négy pont egyikét, amely az ovális alak körüli téglalapot leírja, a Alapértelmezett eszközzel.
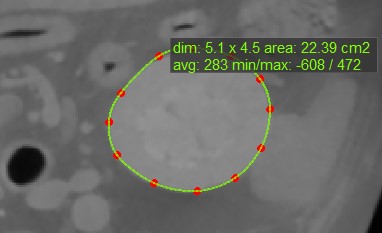
Sokszög mérés

A felhasználók egyedi, lekerekített területeket hozhatnak létre, mérhetnek és jelölhetnek az aktív kép egy szeletén a Sokszög mérés eszközzel.
Válassza ki a Sokszög mérés eszközt, és rendelje hozzá az elérhető egérgombok egyikéhez. Indítsa el a mérést az aktív kép szeletén pontok elhelyezésével. Ahogy a felhasználó pontokat helyez el, a szoftver automatikusan összeköti őket, és létrehozza a lekerekített alakzatot.
Fejezze be a mérést a görbe útvonal manuális bezárásával, vagy kattintson duplán az utolsó pont elhelyezésekor az automatikus bezáráshoz. Az összes elérhető mérési érték megjelenik a mérés mellett.
A kijelölt terület módosításához mozgassa a formát leíró pontok egyikét a Alapértelmezett eszközzel.
Görbe hossz mérés
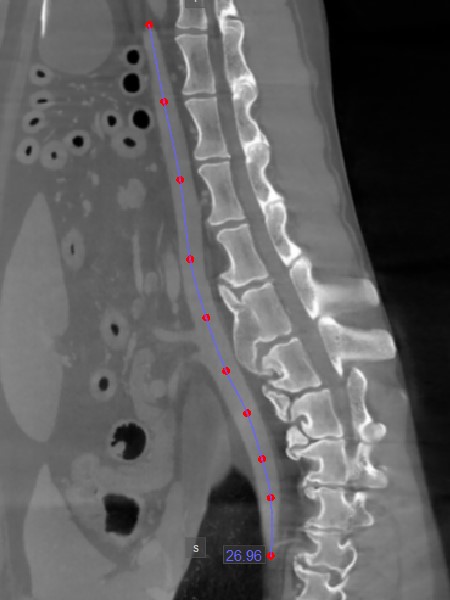
Az Görbe hossz mérés eszköz lehetővé teszi a felhasználók számára, hogy nem lineáris út mentén mérjék meg görbe vonalak vagy komplex alakzatok körvonalának hosszát.
Válassza ki az Görbe hossz mérés eszközt, és rendelje hozzá az elérhető egérgombok egyikéhez. Indítsa el a mérést az aktív kép egy szeletén, nem lineáris út mentén a pontok elhelyezésével. Ahogy a felhasználó pontokat helyez el, a szoftver automatikusan összeköti őket és létrehozza az útvonalat.
Fejezze be a mérést az útvonal utolsó pontjának elhelyezésekor duplakattintással, vagy használja a jobb egérgombot az útvonal azonnali kiszámításához. Az útvonal hossza megjelenik a mérés mellett.
Az útvonal módosításához mozgassa a formát leíró pontok egyikét a Alapértelmezett eszközzel.
Ecset eszköz

Az Ecset eszköz lehetővé teszi a felhasználók számára, hogy szabadkézi alakzatokat és rajzokat készítsenek a képen.
Az Ecset eszközt a bal oldali eszköztár ikonjára kattintva kapcsolhatja be vagy ki. Az Ecset eszközök panel a mérés aktiválásakor nyílik meg.
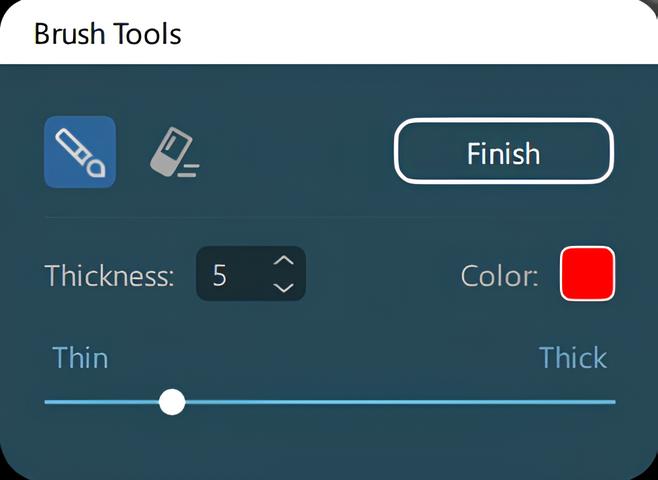
Az ecset méretét (vastagságát) a panelen található
Vastagságbeviteli mező vagy csúszka segítségével állíthatja be.A rajzolási mód indításához válassza ki az ecset ikont, törléshez pedig a radír ikont. Csak az aktuálisan aktív ecsetmérés törölhető.
Másik rajzszín kiválasztásához kattintson az aktív színre, majd válasszon az elérhető opciók közül.
A rajzoláshoz vagy törléshez tartsa lenyomva a bal egérgombot a képen, az éppen kiválasztott módnak megfelelően.
A mérés befejezéséhez kattintson a jobb egérgombbal a képre, vagy nyomja meg a panelen található
Bezárásgombot.
Az összes elérhető mérési érték megjelenik a mérés mellett.