Fájlok exportálása

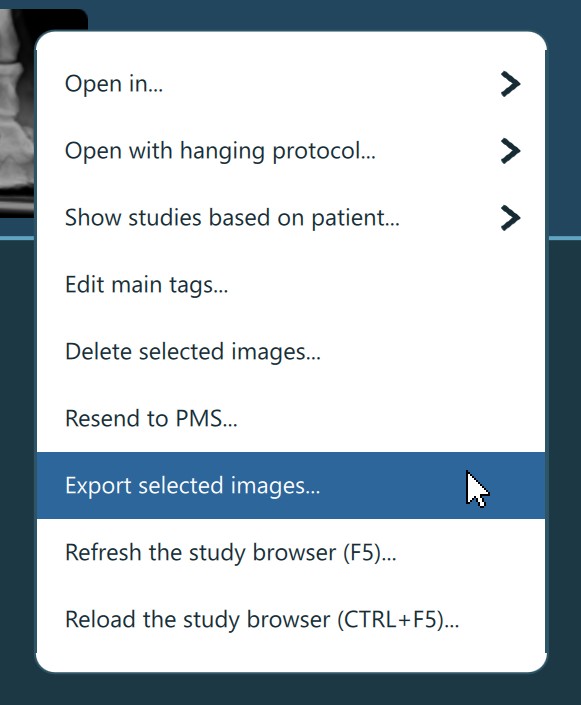
A kiválasztott beteg, tanulmány és/vagy sorozat exportálásához nyomd meg a Exportálás ikont a Tanulmányböngésző eszköztárában, vagy válaszd a Kiválasztott képek exportálása... opciót a helyi menüből.
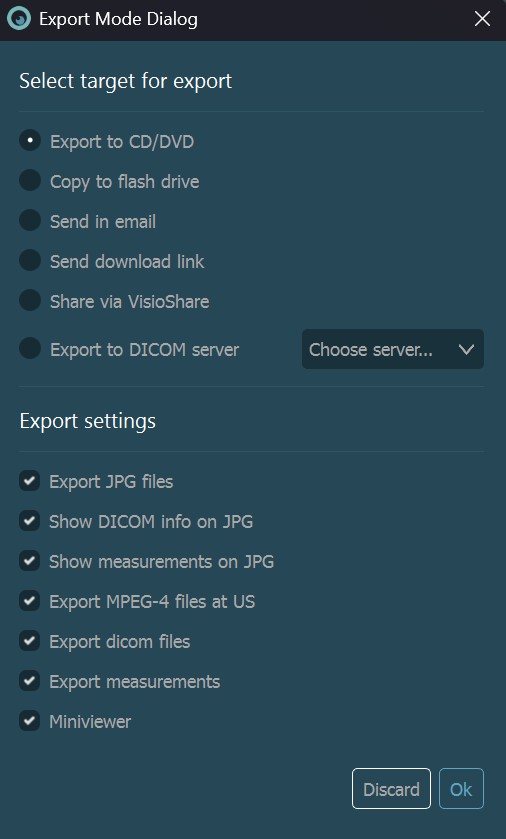
Ok gombot a folyamat elindításához. A VisioVIEW elkezdi a fájlok előkészítését az exportáláshoz, és a felhasználók könnyen nyomon követhetik a folyamat előrehaladását és státuszát. A folyamat megszakításához nyomd meg az Elvetés gombot.Export célok
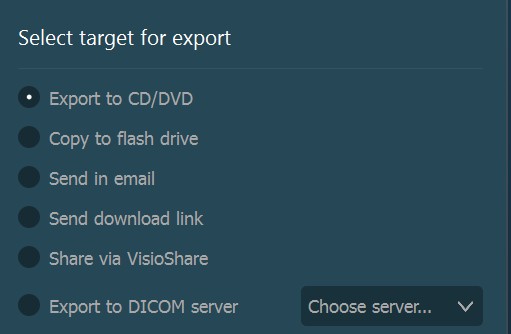
A VisioVIEW több lehetőséget kínál az előkészített fájlok exportálására.
Exportálás CD/DVD-re
Várjon, amíg a VisioVIEW előkészíti a fájlokat az exportáláshoz. Miután az adatelőkészítés sikeresen befejeződött, válassza ki a céleszközt az exportálás párbeszédablakának alján.
Győződjön meg róla, hogy egy üres, írható CD/DVD került behelyezésre a céleszközbe. Ha az eszközt nem ismeri fel a rendszer, kattintson a
Média frissítésegombra.A kiválasztott céleszközre történő írás megkezdéséhez nyomja meg a
Írásgombot. A folyamat megszakításához nyomja meg azElvetésgombot.
Másolás pendrive-ra/helyi meghajtóra
Várjon, amíg a VisioVIEW előkészíti a fájlokat az exportáláshoz. Miután az adatelőkészítés sikeresen befejeződött, válassza ki az export célhelyét az exportálás párbeszédablakának alján. A kívánt hely kiválasztásához böngésszen a rendszer Fájlkezelőjében.
Győződjün meg róla, hogy elegendő szabad hely áll rendelkezésre a kiválasztott célhelyen. Az előkészített export mérete megjelenik a párbeszédablakban.
A fájlok másolásának elindításához a kiválasztott helyre kattintson a
Fájlok exportálásagombra. A folyamat megszakításához nyomd meg azElvetésgombot.
E-mailben küldés
Ennek a lehetőségnek a használatához győződjön meg róla, hogy a e-mail beállítások helyesen vannak konfigurálva. Az e-mailek csatolmányméret korlátai miatt az exportálás során a DICOM és MPEG-4 videófájlok, valamint a különálló DICOM Start szoftver küldése nem engedélyezett.
Várjon, amíg a VisioVIEW előkészíti a fájlokat az exportáláshoz. Miután az adatelőkészítés sikeresen befejeződött, töltse ki a szükséges adatokat a mezőkben. A munkát megkönnyítheti és felgyorsíthatja a e-mail sablon beállításával.
E-mail cím: A felhasználó e-mail címe, akinek az üzenetet küldeni kell.
Tárgy: Az e-mail tárgya.
Üzenet: Üzenet, amelyet a csatolt fájlokkal együtt kíván elküldeni.
Miután minden szükséges információt megadott, kattintson a
Levél küldésegombra az e-mail elküldéséhez. A folyamat megszakításához kattintson azElvetésgombra.Hogy megszakítás nélkül tudja folytatni a munkát, miközben a VisioVIEW előkészíti a fájlokat az exportáláshoz, kattintson az
Exportálás háttérbengombra.
Letöltési link küldése
Engedélyezze az AWS szolgáltatásokat, hogy ez a lehetőség elérhető legyen az exportálási célok közt. Győződjön meg róla, hogy az e-mail beállítások helyesen vannak konfigurálva, mielőtt folytatná.
Várjon, amíg a VisioVIEW előkészíti a fájlokat az exportáláshoz. Miután az adatelőkészítés sikeresen befejeződött, töltse ki a szükséges adatokat a mezőkben. A munkát megkönnyítheti és felgyorsíthatja a e-mail sablon beállításával.
E-mail cím: A felhasználó e-mail címe, akinek az üzenetet küldeni kell.
Tárgy: Az e-mail tárgya.
Üzenet: Üzenet, amelyet a letöltési hivatkozással együtt szeretne elküldeni. Győződj meg róla, hogy a letöltési hivatkozás változatlan marad az e-mailben elküldés előtt.
Miután minden szükséges információt megadott, kattintson a
Levél küldésegombra az e-mail elküldéséhez. A folyamat megszakításához kattintson azElvetésgombra.Hogy megszakítás nélkül tudja folytatni a munkát, miközben a VisioVIEW előkészíti a fájlokat az exportáláshoz, kattintson az
Exportálás háttérbengombra.
Exportálás DICOM szerverre
A felhasználók számára lehetséges fájlok áthelyezése egy PACS szerverről egy másikra. Ez a funkció csak DICOM fájlokra korlátozódik.
Válassza ki a cél PACS szervert a
Exportálás DICOM szerverrelegördülő menüből.Amikor az exportálási folyamat elindul, a VisioVIEW megnyitja a feltöltés állapotablakot, ahol a felhasználók nyomon követhetik minden DICOM fájl cél szerverre történő feltöltésének előrehaladását . A folyamat megszakításához kattintson az
Elvetésgombra. A folyamat befejezése után az ablak bezárásához nkattintson azOKgombra.Nagy mennyiségű fájl exportálása több percet is igénybe vehet. Kattintson a
Feltöltés háttérbengombra, hogy a VisioVIEW szoftvert megszakítás nélkül tovább használhassa, miközben a fájlok a háttérben exportálódnak.
Információ
A kiválasztott exportcéltól és módtól függetlenül a felhasználók testreszabhatják az exportált fájlok neveit a kívánt sablon megadásával.
Exportálási beállítások
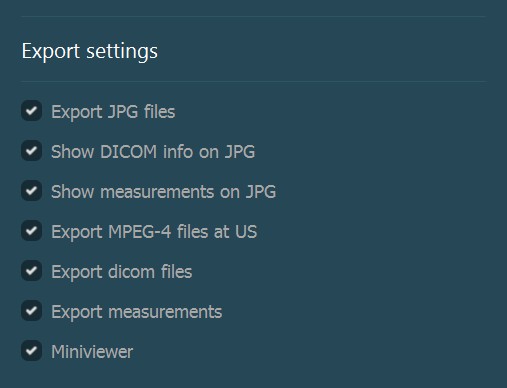
A VisioVIEW számos beállítási lehetőséget kínál minden exportcélhoz. Ezekre a beállításokra bizonyos korlátozások vonatkozhatnak a kiválasztott mód függvényében.
JPG fájlok exportálása: A DICOM fájlok exportálása JPG képként. Az exportált képek minőségét az Exportálási beállítások menüben adhatja meg.
DICOM információ megjelenítése a JPG-n: Be- vagy kikapcsolhatja, hogy a annotációk megjelenjenek-e az exportált JPG képeken. Ez az opció csak akkor engedélyezett, ha a fájlok JPG formátumban történő exportálásra vannak kiválasztva.
Mérések megjelenítése a JPG fájlokon: Be- vagy kikapcsolhatja, hogy a mentett mérések megjelenjenek-e az exportált JPG képeken. Ez az opció csak akkor engedélyezett, ha a fájlok JPG formátumban történő exportálásra vannak kiválasztva.
MPEG-4 fájlok exportálása US esetén: A DICOM többképkockás UH (ultrahang) modalitás fájlok exportálása MPEG-4 videófájlokként. Az exportált videók minőségét az Exportálási beállítások menüben adhatja meg.
DICOM fájlok exportálása: A kiválasztott DICOM fájlok exportálása.
Mérések exportálása: A mentett mérési fájlok exportálása a megfelelő DICOM fájlokkal együtt. Ez az opció csak akkor engedélyezett, ha a DICOM fájlok exportálásra vannak kiválasztva.
MiniViewer: Az exportált fájlok mellé a
DICOM Startszoftver is elhelyezésre kerül. Ez lehetőséget biztosít arra, hogy az exportált DICOM fájlokat aVisioVIEW MiniViewersegítségével, az exportált JPG képeket pedig a böngészőben megnyíló VisioVIEW Gallery-ben lehessen megtekinteni. Ez a beállítás csak akkor érhető el, ha DICOM fájlok kerülnek kiválasztásra exportálásra.